

How To Quickly Do an Email Blacklist Check (and What to Do If You’re Listed)
One month your email campaigns may reach all inboxes, and the next month half of them end up in Promotions or Spam. The copy may be the same, the list may come from the usual source, and even the sending schedule may not have changed. At this point, most people start wondering whether they’ve been blacklisted.
Well, the good news is that finding out takes about five minutes. Reading the result is where it usually goes wrong, since a standard email blacklist check throws back a hundred lists with equal weight and no context.
Below, we’ll cover what the email blacklist check actually looks at, along with a five-minute routine to run it properly.
What does an email blacklist check actually look at?
An email blacklist check looks up your sending IP address and your sending domain against DNS-based blocklists (DNSBLs), which are databases that receiving mail servers query in real time before they accept any messages. If your IP or domain appears on a list that server uses, your email gets rejected, filtered, or scored down.
Your individual email address is almost never what gets listed. When people try to check their email address blacklist status, what they’re really checking is the domain after the @ and the server that sent the message. Every mailbox on that domain shares the result.
The lists themselves split into two types:
- IP blocklists track the servers that send mail. The best known is Spamhaus ZEN, which combines four Spamhaus lists (SBL, CSS, XBL, and PBL). Barracuda’s BRBL and SpamCop are also IP lists.
- Domain blocklists track domain names. The Spamhaus DBL is the main one, and it catches domains in two places: the sending domain, and any domain linked in the body of the email.
Before you run anything, keep in mind that a listing is a signal receiving servers *may* use. Whether it hurts you depends on which list it is and who relies on it.
How to find the IP and domain you’re really sending from
Most people paste their domain into a checker and stop there. That’s half the check, because the IP is often the part that’s listed.
To find the IP your mail actually leaves from:
- Send a test email to a Gmail address you own.
- Open it, click the three dots, and choose Show original. In Outlook, use View message source or the message headers.
- Look for the Authentication-Results line. It usually reads something like spf=pass … designates 203.0.113.10 as a permitted sender. That IP is your sending server.
- Note the domain in smtp.mailfrom on the same line. That’s the domain receivers are judging.
Now look at who owns that IP. If you send through Google Workspace or Microsoft 365, it belongs to Google or Microsoft and is shared with thousands of other senders. A listing on a shared IP isn’t yours to fix, and a blacklist email check on it tells you very little about your own sending. Your domain is the part you control.
On a dedicated IP, your own mail server, or an email service provider with IPs assigned to you, the picture flips. The IP carries your history, so it deserves a closer look.
How to do an email blacklist check in five minutes
Check your sending IP and domain in a multi-list tool, confirm any important hits at the source, then look at Gmail’s and Microsoft’s own signals. The full routine, step by step:
- Grab your sending IP and domain using the header method above.
- Run both through an email blacklist checker → MXToolbox and MultiRBL (multirbl.valli.org) each query around 100 lists at once. Run the IP and the domain as separate lookups, since most tools only check what you give them. Cisco Talos Intelligence adds a Good, Neutral, or Poor email reputation score for the IP.
- Confirm anything serious at the source → Spamhaus has its own IP and Domain Reputation Checker at check.spamhaus.org, and it’s the most reliable way to check email domain blacklist status on the DBL. It also tells you why you’re listed, which third-party tools usually don’t.
- Check the big providers’ own data → Gmail and Outlook lean mostly on their internal reputation systems, so a clean result on public lists doesn’t mean a clean result there. In Google Postmaster Tools, look at your spam rate, since Google explicitly asks you to stay under 0.1%, or 0.3% at the very most. For Outlook.com traffic, Microsoft’s SNDS shows data for IPs you own.
- Read your bounces → The fastest way to check email for blacklist problems is the rejection text itself. blocked using zen.spamhaus.org names the list outright. From Microsoft, 550 5.7.606-649 Access denied, banned sending IP means you’re on its internal block list.
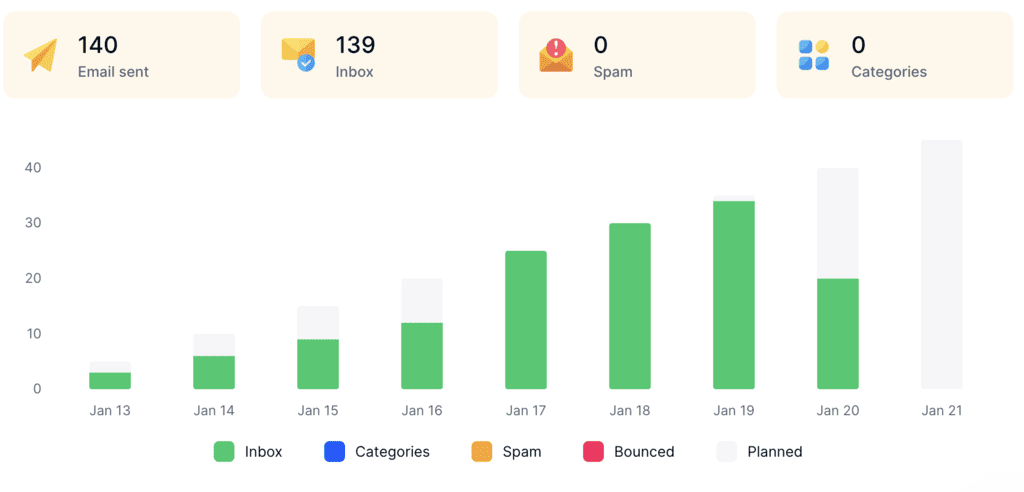
None of those steps show you where your mail is landing right now, and that’s usually the earliest warning. A listing tends to show up as a slide into spam long before it shows up as a bounce, and that shift is what MailToaster’s placement reports track: inbox, spam, and categories, per mailbox.
Why a DIY lookup can say you’re clean when you’re not
If you query Spamhaus yourself with dig, or your mail server resolves through a public DNS service, the answer you get back may be wrong.
According to Spamhaus’s own FAQ, queries sent through open resolvers such as Google Public DNS (8.8.8.8) will in most cases return “not listed”, whether you’re listed or not. Some come back with 127.255.255.254, which looks like a listing but is actually an error code meaning “query via public/open resolver”. Anything in the 127.255.255.x range is an error, not a verdict.
So if a quick lookup says you’re clean and your bounces say otherwise, trust the bounces and recheck at check.spamhaus.org.
Which blacklists actually matter?
An email blacklist checker that flags you on 3 lists out of 100 isn’t telling you about three problems. Some listings will block mail at thousands of companies, while others are ignored by nearly every receiver that matters. This is how to read the results of an email blacklist check:
| Blacklist | What it lists | How much it matters | How to get off | How long it takes |
|---|---|---|---|---|
| Spamhaus SBL / XBL / DBL | Spam sources, compromised machines, bad domains | High. Very widely used by receiving servers | Fix the cause, then self-service removal at check.spamhaus.org. Never a fee | Minutes to 24 hours once approved |
| Spamhaus PBL | End-user IP ranges (home broadband etc.) | Low if you send through an authenticated provider | Nothing to do unless you send direct from that IP | n/a |
| Barracuda BRBL | IPs that sent spam to Barracuda users | Medium to high in B2B, where Barracuda appliances are common | One removal request via the form on barracudacentral.org | Typically within 12 hours |
| SpamCop | IPs reported by users as spam sources | Medium, short-lived | Stop the cause and wait | Automatic, 24 hours after reports stop |
| Microsoft (internal) | IPs sending to Outlook, Hotmail and Microsoft 365 | High for any Microsoft recipients | Delist portal at sender.office.com | Up to 24 hours or longer |
| UCEPROTECT Level 2 / 3 | Whole IP ranges and hosting networks | Low. Few major receivers rely on it | Expires once the range stops matching. Paid express delisting is sold | Varies |
A PBL listing on its own is not a penalty. Spamhaus describes those IPs as “not necessarily bad”, and the listing doesn’t affect mail you send through an authenticated provider. And by the way, don’t pay anyone to delist you: Spamhaus states there is never a charge for removal, while the lists that do charge are the ones that matter least.
Why senders end up on a blacklist
Nearly every listing traces back to one of five things:
- Spam traps: These are addresses that never belonged to a real person, or old addresses that were abandoned and recycled by the provider. They only end up in your list if you bought it, scraped it, or kept mailing contacts for years without cleaning it.
- Complaint spikes: Recipients hitting “report spam” send the loudest negative signal there is, and it’s the one Gmail measures against that 0.3% line we just mentioned.
- Sudden volume on a cold domain: One that goes from zero to several hundred emails a day looks a lot like a spammer spinning up fresh infrastructure.
- A compromised account or server: A hijacked mailbox can send thousands of spam emails under your name overnight, and malware-infected machines are what the Spamhaus XBL is built to catch.
- Spoofing: Missing SPF, DKIM, and DMARC won’t get you listed on their own, but they make it easy for someone else to send spam as your domain, and that can put your domain on the DBL.
Most of these come from cold outreach at volume, where bought lists, a single domain carrying every email, and one generic template going to a thousand people are the usual recipe for a listing.
An AI outreach platform like Reply.io takes most of that risk out before the first email leaves, since all contacts get verified before they enter a campaign, while its AI engine researches each lead to create personalized emails and LinkedIn messages, rather than generic mass emails.
How to get off an email blacklist
Getting delisted is mostly paperwork. The part that decides whether you stay delisted is what you fix first:
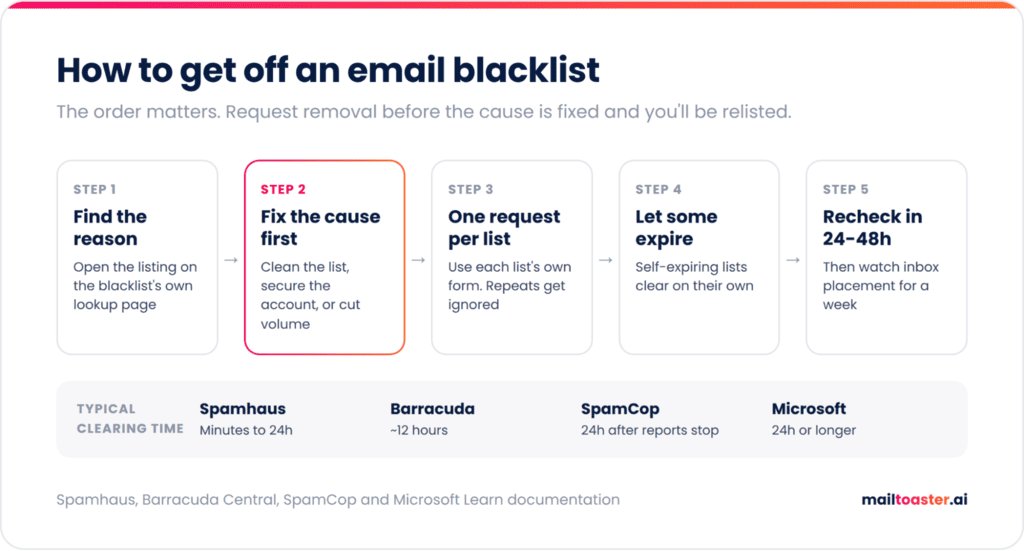
1. Find the reason → Open the listing on the blacklist’s own lookup page. Spamhaus, Barracuda, and Microsoft all show why an IP or domain was listed, and the reason tells you what to fix.
2. Fix the cause before you request anything → If the listing points to spam traps or a bad list, clean the list before your next send. Secure a compromised account, pause the campaign that caused a complaint spike, or cut volume on a new domain. Request removal before the cause is gone and you’ll be relisted, and most operators stop taking you seriously after that.
If your list is the likely culprit, run it through a validator before you send another email to it. Dead addresses, disposable domains, and typos all look fine in a spreadsheet but very different to a blacklist operator. You can check yours right away:
Free Email Validation Tool
Check one address or paste a whole list. Catches broken syntax, dead domains, disposable inboxes, role accounts and typos — and confirms each domain can actually receive mail. Runs in your browser; your list is never uploaded.
What each result means
- Deliverable — valid syntax and the domain has working mail servers. Safe to send to, as far as anything short of an SMTP check can tell.
- Role address —
info@,sales@,support@. A shared mailbox, not a person. They generate more spam complaints than any other category, and some ESPs block them outright. - Disposable — a throwaway inbox that likely stopped existing minutes after signup. Never mail these; they inflate your bounce rate and tell you nothing about the person.
- Free provider — a personal address. Perfectly valid, but in B2B it usually means you haven’t found their work address yet.
- Possible typo — the domain is one or two characters from a very common one.
gmial.com,hotmial.comandyaho.comare all real things people type. - Dead domain / No mail server — the domain doesn’t exist, or publishes no way to receive mail. These bounce every time.
Why bounce rate is worth protecting
- Keep hard bounces under 2%. Above that, mailbox providers start treating you as someone working from a scraped list — and that reputation follows the domain, not the campaign.
- Validate before every send, not once. B2B lists decay fast: people change jobs constantly, and an address that worked last quarter may be gone this one.
- Catch-all domains accept everything. They never bounce, so nothing looks wrong — right up until your engagement rates crater. If a domain accepts every address you invent, treat its addresses as unconfirmed.
- A clean list beats a big one. Removing dead addresses raises your open and reply rates and protects the sending domain that your real conversations depend on.
3. Submit one removal request per list → Use each list’s own form. Barracuda disregards repeat submissions, so one clear request with a short explanation of what you fixed is enough. For Microsoft, go to the delist portal, enter the email address that got the bounce and the IP from the error message (one of each per visit), confirm through the email link, then click Delist IP.
4. Let the self-expiring lists expire → SpamCop removes listings automatically 24 hours after reports stop. There’s no form to fill in and nothing to speed it up.
5 .Re-run your email blacklist check after 24 to 48 hours → then keep an eye on placement for the following week. Being off the list and being back in the inbox are two separate milestones.
How often should you check, and how do you stay off?
If you send cold outreach at volume, check email blacklist status weekly, plus every time before a new campaign and immediately after any sudden drop in opens or replies. Once you’re managing more than a few domains, switch from manual lookups to a monitoring tool that alerts you when a listing appears.
Staying off those blacklists comes down to reversing the causes above: a verified list, SPF, DKIM, and DMARC in place, gradual volume increases, and steady engagement. Together, those build your email address reputation, and that’s the thing blocklist operators and mailbox providers are really judging.
A blacklist check is reactive by design, as it tells you about damage that’s already done.
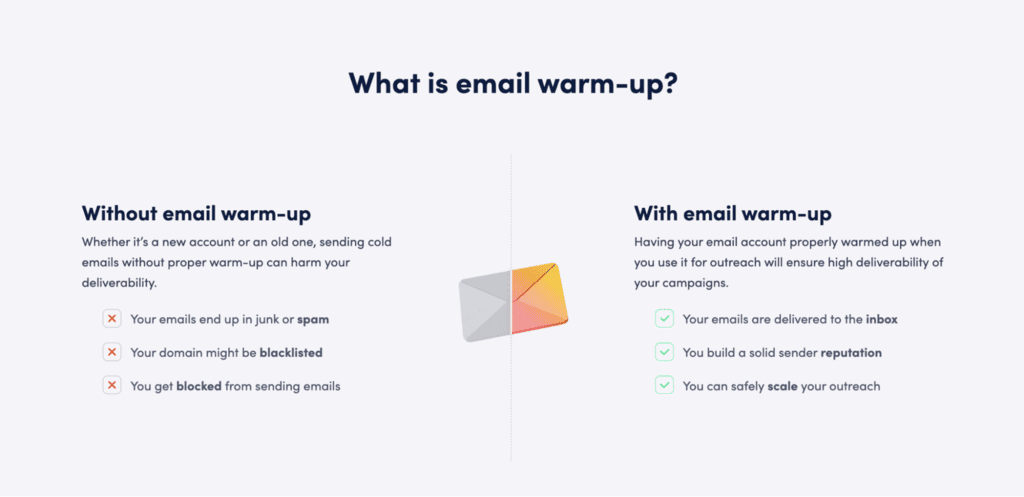
Reputation is what keeps you off the lists in the first place, and it gets built the slow way, through a consistent history of sending that people open and reply to. That’s the job email warm-up does.
Email warm-up with MailToaster
MailToaster fully automates the email warm-up process. You simply connect a Gmail, Outlook, or other mailbox in a couple of clicks and pick a profile: New Email Account to ramp up a cold domain gradually, so it never hits the sudden-volume pattern above, or Reputation Protect to keep an established sender steady.
Your emails then go through a peer-to-peer network of real inboxes, with no free or temporary accounts, gradually increasing volume over time. Those emails get opened, replied to, marked as important, and pulled out of spam — which is exactly what builds that positive domain history that your recipients’ email providers look at.
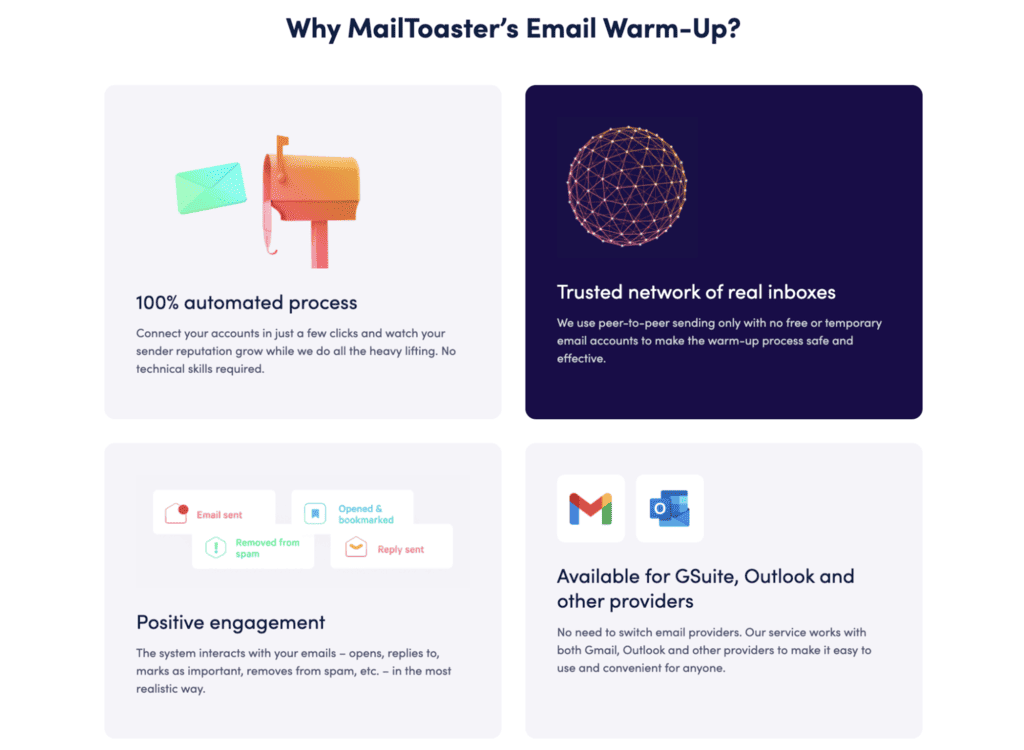
The platform also has a built-in DNS check that validates your SPF, DKIM, and DMARC records automatically, and placement reports show inbox vs spam vs categories so drops in inbox placement are visible early. Plans start at \$29 per email account per month, with a 7-day free trial.
Wrapping up
In short, find your real sending IP and domain in the headers, run both through a multi-list checker, confirm anything serious at the source, and read Gmail’s and Microsoft’s own data before you panic. After that it’s triage: Spamhaus, Barracuda, and Microsoft listings need action, while most of the rest can be left alone or left to expire.
Fix the cause before you request removal, every time. Once you’re clean, warm up your mailboxes with MailToaster and build the kind of sending history that keeps the next check uneventful.
FAQ
Can an individual email address be blacklisted?
Rarely in the public blocklists. DNSBLs list sending IPs and domains, so a problem with one mailbox usually shows up as a listing for the whole domain or server. Individual addresses can be blocked by specific recipients or by a provider’s internal systems, which is a narrower problem.
Does being blacklisted always hurt deliverability?
No. It depends on the list. A Spamhaus SBL or Microsoft listing can block mail outright, while a UCEPROTECT Level 3 or PBL listing often has no visible effect. Gmail and Outlook rely mostly on their own reputation data, so placement is the real test.
How long does it take to get off an email blacklist?
Anywhere from minutes to a few days once the cause is fixed. SpamCop clears automatically after 24 hours, Barracuda typically processes requests within 12 hours, and Spamhaus approvals take minutes to 24 hours. Microsoft says up to 24 hours or longer.
Is it free to check and get removed from a blacklist?
Yes for every list that matters. Checking is free with tools like MXToolbox and Spamhaus’s own checker, and Spamhaus never charges for removal. If a list asks for payment to delist you, it’s usually a list few receivers use, so fix the cause and let it expire.
Will running a blacklist check affect my sender reputation?
No. A blacklist check is a DNS lookup against a public database, so nothing gets sent from your mailbox and no mailbox provider sees it. You can run checks as often as you like, on your own domains or on a client’s, without any effect on deliverability.